Bulk generate on-brand, customized content for multiple products in just a few clicks. Here's how!
In this article
- Create content for multiple products
- Review & approve your content
- Audit your content
- Publish your content
Create content for multiple products
Tip: If you have minimal product data, we recommend first using data enrichment to pull in more information for higher content quality.
- From your catalog, select the products you'd like to create content for.
Note: Select the box on the top left to select all products on that page, or the Select all button to select all products in your catalog. - On the top right, click Create Content.

- Re-name your bulk job if you'd like (it will default to the current date and timestamp).
- Select the appropriate Content Ruleset from the dropdown. To view a selected ruleset, click the pencil icon.

IMPORTANT: If you're creating HTML descriptions or a custom field outside of Describely's defaults, you may need to choose a unique ruleset and generate that field separately. - Optional: If you have images available (either from import or data enrichment), we recommend using them in the generation. This can further improve content quality!
- If you're not creating an HTML description: Keep Product Details selected, and select Description.
Note: If you'd like, you can create new titles, bullet points, keywords, meta titles, & meta descriptions as well. Bullet points can be merged to the end of your descriptions when you publish.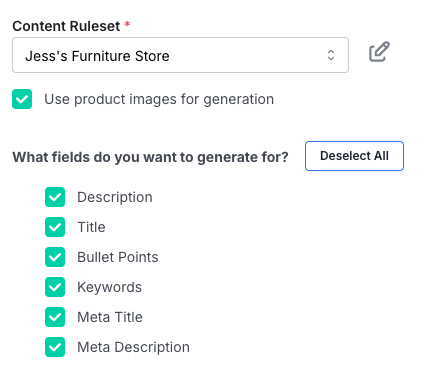
- Click Start Bulk Generate. When the generation is complete, you'll see a notification at the top indicating that your bulk job is ready for review.

Stuck? Check out our FAQ on content creation here. We're here to help at support@describely.ai.
Review & approve your content
Note: Approving content will apply it to your products in Describely, so it can be exported or published from your catalog, so make sure not to miss this step!
You can also approve & export/publish content right from any bulk job.
- On the top right, click the Bulk Jobs Review button to view all of your bulk jobs.
- Locate the pending bulk job(s), which will be in a Ready For Review status. Use the search bar or sort filters on the top right if needed.

- Click on a bulk job to review the generated content.
- To approve content one product at a time, select Approve next to the product.
To approve content for multiple products at once, select your products and click Approve on the top.
- To edit content before approving, click the green Edit button next to your product. You'll see an option here to easily re-generate content one product at a time.

Need a different version? When editing any product's content, click Regenerate. If you'd like, enter a prompt to guide the AI like "make this shorter". To regenerate in bulk, select the products and click Create Content at the top.
6. Once you've reviewed all generations, click Bulk Jobs on the top left to return to your bulk history list.

7. To mark the bulk job reviewed, click the three dots under the Actions column and select Set As Reviewed.
Stuck? Check out our FAQ on content creation here. We're here to help at support@describely.ai.
Audit your content
Before publishing your content, you have the optional step of having Describely audit your content for grammatical errors, content guideline adherence, and product claims being made. Check out this article for details.
Tip: You can audit both content you wrote and imported into Describely OR content the AI generated for you.
Publish your content
Once you've approved and applied your content to your products in Describely, you're ready to export to a CSV or publish to your store connector!
You can even publish new titles and descriptions to Shopify or WooCommerce right from the bulk job. 😉

Note: If you prefer to work from your catalog, create a custom view filtered to products with the "Approved" status to easily export or publish products ready to go live.